Just a couple of days ago I read an article on SPIEGEL online. It was about HDR or „High Dynamic Range“ imaging, which reminded me of this great technique I now want to introduce you to…
Ages ago – when there was celluloid-film-material used for storing images – photographers started thinking about how to expand the dynamic range of their films. This because the typical lightning of a scene with shadows and highlights has always been too high in contrast for converting it into a picture without losing details. As a matter of fact you always have to decide wether to get the lights or the shadows correct or just don´t care about and concentrate on the main object in the view-finder. You know the result of this: Either the lights are totally white or the shadows are totally black, but you won´t find any details or structure in there.
Back in the analogue times there was something called like „diffuse pre-exposure“. This was a double-exposure-technique using a underexposed (about 2 or 3 f-stops), non-focused picture of a grey cards as a first exposure on that very same slide. With this you could somehow „preload“ or sensitize the silver halides of your film to be more responsive to low light.
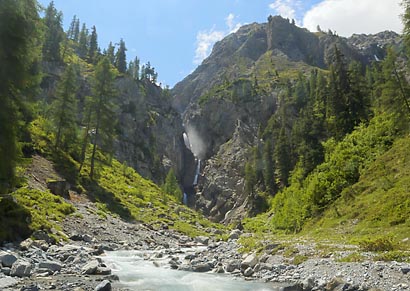
With entering the digital world of photography it´s getting more easy to achieve professional pictures with details even in the lightest lights or darkest shadows. Not only is the dynamic range of CCDs and CMOS-sensors still improving and by now far better than analogue slides have ever been, but also the technique of „High Dynamic Range“ imaging and tonemapping is getting more easy and popular. You can find a workshop and samples of this in the article on „SPIEGEL online“ linked above, but as I find them not representative (too artificial), I attached a photo I took for EWD last summer. I shot about 5 or 6 exposures (ranging from about -2 to +2 f-stops) from which I only show the most extreme and the final picture after tone-mapping it to a regular 8-bit-jpg:

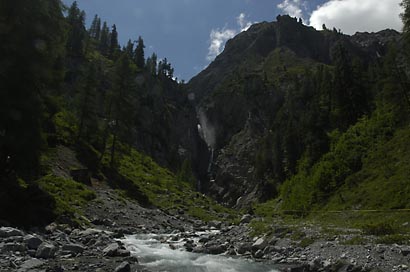
Personally, I think HDR imaging is great to get the most out of scenes with a complex lightning situation and high contrasts. But it is definitively a short way to artificially looking „plastic“ pictures also, so you have to be very careful using it. The reason is quite simple: with HDR you combine several different exposures of the same scene into one single file with 32-bit colors. No screen available today nor any printer is able to reproduce this range of colors and contrast. They only show those lousy 8-bit we are used to. So when it comes to saving the HDR file as .jpg or .tif and showing it on your flickr-account, you have to use a way of tone-mapping. In this step you compress the colors to fit into the 8-bit-range. It´s similar to squeezing your hips into that old 30/34-Lewis after having the christmas-dinner: feels unnatural and uncomfortable 😉
So obviously the tone-mapping is the main part of work, where you need to click around a lot to find the most suitable adjustments. There is a long article on Wikipedia as well, you can read it in english and german. They also have a nice example of a HDR picture from Paulo Barcellos Jr. which I really want to show to you:


Antworten zu „HDR – High Dynamic Range“
Interesting article!
I just stubled upon this HDR on flickr:

Nice Article I have just started using HDR as a creative technique myself. But I agree with you that the subject has to be right. In the Spiegel Article particular where a few images that really did not need any HDR because they were so flat.
[…] posted an interview with Kevin Creley, photographer from Munich. Please also check out my post on HDR. No Comments so far Leave a comment RSS feed for comments on this post. TrackBack URI […]
[…] „High Dynamic Range“ Fotos enthalten mehr Details in Lichtern und Schatten, als eine normale Digitalkamera reproduzieren kann. Der Trick besteht darin, Daten verschiedener Belichtungen desselben Motivs zu verschmelzen. Dafür gibt es mittlerweile diverse Programme und Plugins – im hier verlinkten Workshop wird das neue Photoshop CS5.5 verwendet. HDRs können phänomenale Ergebnisse liefern und bringen das Publikum zum Staunen – leider wirkt die Technik aber auch schnell ausgelutscht, ganz ähnlich wie Duzende von Panoramen oder New York vertikal. Also bitte dezent und sparsam einsetzen Wussten Sie übrigens, dass Ihre SLR-Digitalkamera bereits für die Erstellung von HDR-Bildern vorbereitet ist? Seit den 90er Jahren verfügen elektronisch gesteuerte Kameras über die sogenannte „Bracketing“-Funktion, durch die bei jeder Auslösung gleich 3 (oder sogar 5) Fotos belichtet werden. Je nach Wunsch und Kamera unterscheiden sich die Belichtungen um drittel oder halbe Blendenstufen und liefern so ohne viel zutun die Grundlage für HDRs. Weitere Tipps zu HDR gibt es übrigens hier oder hier. Bitte lesen Sie auch meinen einleitenden Artikel, HDR – High Dynamic Range. […]
[…] „High Dynamic Range“ Fotos enthalten mehr Details in Lichtern und Schatten, als eine normale Digitalkamera reproduzieren kann. Der Trick besteht darin, Daten verschiedener Belichtungen desselben Motivs zu verschmelzen. Dafür gibt es mittlerweile diverse Programme und Plugins – im hier verlinkten Workshop wird das neue Photoshop CS5.5 verwendet. HDRs können phänomenale Ergebnisse liefern und bringen das Publikum zum Staunen – leider wirkt die Technik aber auch schnell ausgelutscht, ganz ähnlich wie Duzende von Panoramen oder New York vertikal. Also bitte dezent und sparsam einsetzen 😉 Wussten Sie übrigens, dass Ihre SLR-Digitalkamera bereits für die Erstellung von HDR-Bildern vorbereitet ist? Seit den 90er Jahren verfügen elektronisch gesteuerte Kameras über die sogenannte „Bracketing“-Funktion, durch die bei jeder Auslösung gleich 3 (oder sogar 5) Fotos belichtet werden. Je nach Wunsch und Kamera unterscheiden sich die Belichtungen um drittel oder halbe Blendenstufen und liefern so ohne viel zutun die Grundlage für HDRs. Weitere Tipps zu HDR gibt es übrigens hier oder hier. Bitte lesen Sie auch meinen einleitenden Artikel, HDR – High Dynamic Range. […]